Letter fixing methods
Simple to use letter fixing systems.
We utilise a range of simple, but effective letter fixing methods on our flat and built up lettering.
Cup & peg locator letter fixing.
The process for using cup and peg locator fixings is detailed below;
|
|
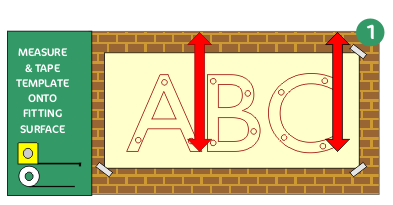
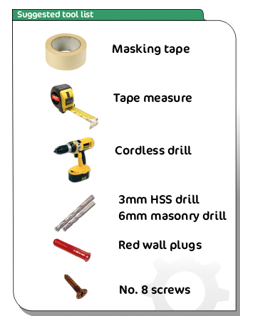
| Step1. Take your pre marked paper template and fix it to your fitting surface using masking tape. This template is the basis for the whole letter fixing system so you MUST get the paper on the fitting surface straight and level. Ensure that the paper is taught over the fitting surface- any slack may impact the alignment of your mounting holes. TIP; if masking tapes doesn't hold switch to duck tape. |
|
|
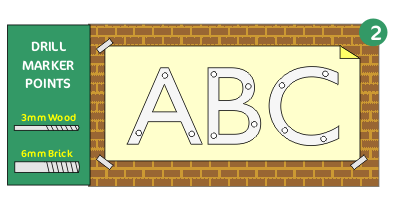
| Step 2 Once you have completed step 1 you can proceed to drilling. Re-check the work carried out in step 1 BEFORE you start drilling. Using the drill points indicated on the template drill out your holes (drill specs and sizes are stated on the diagram). Check all markers have been drilled and then removed the template- do not throw away. |
|
|
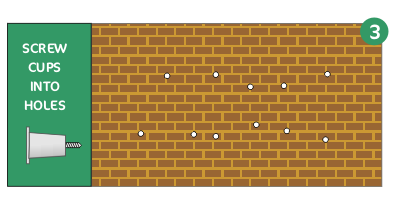
| Step 3 If you have drilled into timber you can screw your cups into place. If you have drilled into masonry, concrete or plaster board you need to load wall plugs into each hole before screwing cups into place. For masonry use RED plugs. Cups require a number 8 screw. |
|
|
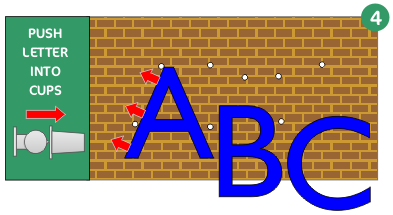
| Step 4. With all cups attached to the fitting surface you can start to load your lettering onto the cup part of the locators. Apply firm, even pressure until you hear a clicking sound- this indicates that the cups and pegs are fully locked. Once all letters are installed correctly you may discard the template. |
Notes on this type of letter fixing;
To remove letters fixed with this system you should gently leaver from behind- do not pull letters out of their cups.
Tools you will need to use this fixing system
Fixings for built up lettering